
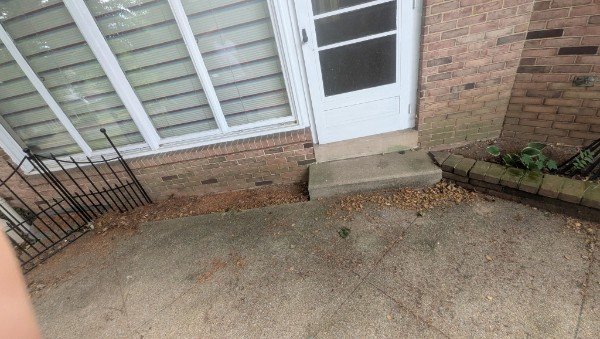
 Before
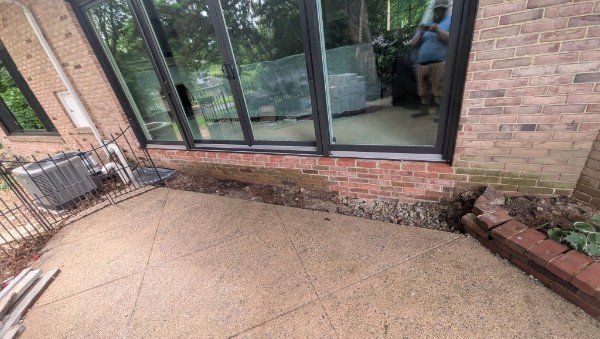 After
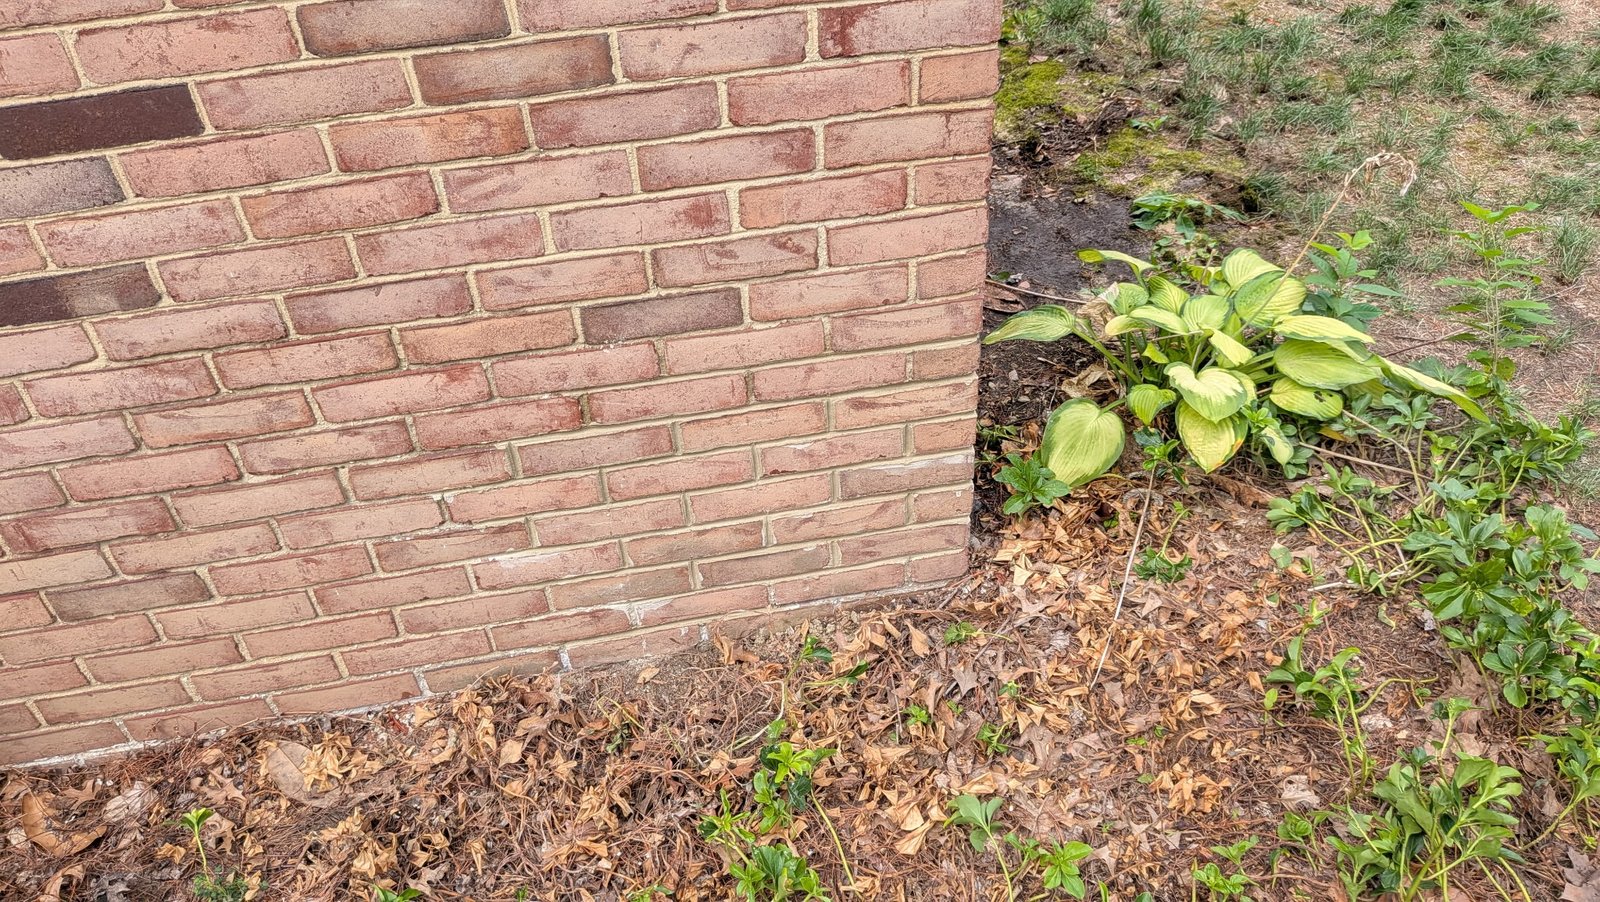
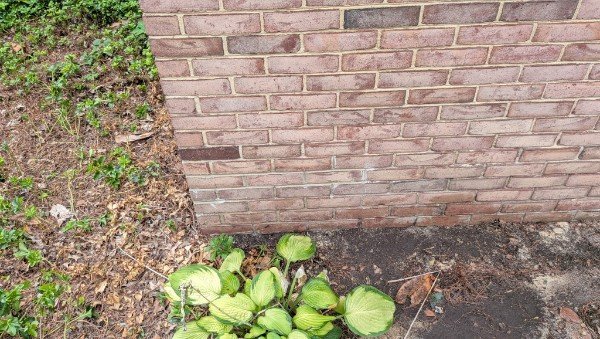
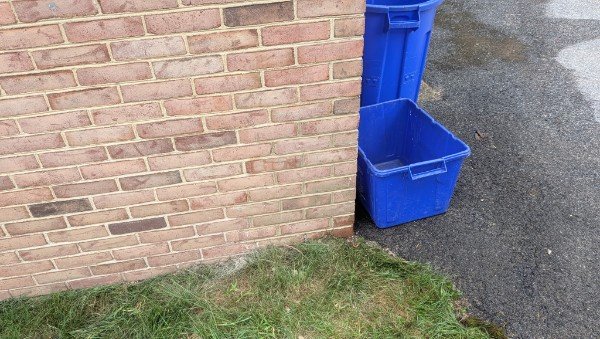
Top: the old single door and stoop, and the same wall after the opening was widened for the new glass door. Bottom row: repointed joints at the corners and along the base of the house.
L
LBE Masonry Team
Masonry Contractors, York County PA
Changing the size of an opening in a brick wall is one of those jobs that looks simple from the patio and is anything but simple inside the wall. We do a lot of these for homeowners who are upgrading a door or a window, and we almost always get asked to repoint while we are there.
The homeowner had already picked out the door. It was a wide, black-framed glass unit, and it was never going to fit through the narrow opening where the old white door stood. Our job was to get the brick ready for it, and while we were on site, to bring the tired mortar joints around the house back into shape.
This house in York County has the kind of brick you see all over south-central Pennsylvania: a warm red and brown blend laid in running bond, with a concrete patio out back and an iron fence along the side yard. For years the back wall had a single door with a small concrete stoop and a bank of white windows beside it. The homeowner wanted to open that wall up to the patio with a much wider glass door, and they had the door on order before they called us.
That is the right order of operations, by the way. The door unit sets the size of the opening, not the other way around. Once we had the manufacturer’s rough opening dimensions in hand, we could plan exactly how much brick had to come out, what size lintel had to go in above it, and how the brick below the new sill would be rebuilt. The customer’s door installer handled the door itself. We handled everything in the brick.
The second part of the job was repointing. Walking the house, there were plenty of joints where the mortar had weathered back, cracked, or crumbled out, especially down low near grade and at the corners. Repointing those joints while we already had the saw, the mixer, and a matched mortar on site made sense for the homeowner. It is also the kind of work that costs far less to do early than late.
A door opening in a brick wall is only as good as whatever is holding up the brick above it. Everything else is cosmetic.
The lintel is the one part of this job nobody will ever see, and it matters more than anything they will.About those blue bins: Yes, the recycling bins made it into one of the repointing photos. We thought about moving them for the shot. Then we figured you would rather see the joints the way they look on an ordinary Tuesday than a staged photo. The joints are the point.
What the Job Involved
Widening an existing opening in a brick wall is a sequence, and the order matters. Here is how this one went from a narrow door to a wide one without disturbing the wall around it.
01
Layout and Checking What Sits Above
We marked the new opening on the wall using the rough opening size from the door spec, then looked at what the brick above was carrying: floor framing, the wall above, and the windows on the second story. We also checked the wall cavity for wiring and plumbing before any cutting started. Surprises inside a wall are expensive, so this step is slow on purpose.
02
Supporting the Wall and Cutting the Brick
Before a single brick came out, the masonry above the new opening was supported. The brick was then cut to the layout lines with a masonry saw rather than hammered out. Sawing keeps the new jambs straight and plumb, and it keeps the brick on either side of the cut from being shaken loose. The old narrow door and the small concrete stoop came out at this stage.
03
Setting the New Lintel
A wider opening needs a bigger lintel than the one that was over the old door. A steel lintel sized for the new span was set into pockets bearing on solid brick at each end, with proper bearing length, and the brick above it was packed tight so there is no gap for the wall to settle into. This is the structural heart of the job.
04
Rebuilding the Brick Below the Sill
The old door sat at one height and the windows next to it sat at another, so the wall under the new opening had to be rebuilt to one consistent level across the full width. You can see the new courses in the after photo: fresh brick, lighter joints, running the whole span under the door. We laid them so the door installer landed on a level, solid sill.
05
Repointing Around the House
With the opening done, we moved around the exterior raking out failed joints, cleaning them, packing in new mortar in lifts, and tooling the joints to match the original profile. Most of the work was at the corners and in the lower courses, which is where water and freeze-thaw cycles do the most damage.
Why You Cannot Just Cut a Bigger Hole in a Brick Wall
Brick is strong in compression, which is why a wall of it can stand for a century. It is weak in bending, which is why it needs help whenever there is a hole in it. Above every door and window in a brick house there is a lintel, usually steel in a house of this age, carrying the weight of the brick above across the opening and down into the brick on either side.
When you make the opening wider, two things change at once. The span gets longer, so the lintel has to be deeper or heavier to carry the same load. And the load itself often goes up, because a wider opening collects more of the wall above it. The old lintel over a 36-inch door is not sized for a span twice that wide. Reusing it is not a shortcut, it is a crack waiting to happen.
The tricky part is that brick will often hold itself up for a while after a bad cut. Masonry arches over an opening naturally, and the wall can look fine for a season or two. Then a stepped crack appears above one corner of the new door, the frame starts to rack, and the door binds. By that point the fix means pulling brick back out and doing the job the right way, with a new door already in the way.
Cut first, worry later
Cut the wider opening, leave the old lintel or skip it, and hope the brick above holds itself. It often does for a while. Then a stepped crack shows up above a corner, the door starts to bind, and the repair now costs more than the original job would have.
Planned opening (this project)
Rough opening taken from the door spec, wall supported, brick sawn to clean lines, lintel sized for the new span and bearing on solid brick at both ends, lower courses rebuilt level. The door goes in once and stays square.
Coordinating with the Door Installer
On a job like this there are two trades touching the same hole in the wall, so the handoff has to be clear. We had the homeowner send us the door manufacturer’s rough opening dimensions before we started. That number includes the shim space the installer needs around the frame, and it is the number we built to. If the masonry opening is cut to the door size instead of the rough opening size, the installer cannot square the frame, and the door never operates right.
Sill height was the other conversation. The patio slab sets the floor level outside, and the homeowner wanted the threshold to land comfortably relative to it. Rebuilding the brick below the opening to one level let the installer set the sill pan and flashing on a flat, solid base instead of shimming over a stepped wall.
The sequence was simple once everyone agreed on it: we cut and built the opening, the mortar cured, the door went in, and we came back to finish the pointing at the jambs after the frame was set. Finishing the jamb joints last means the mortar closes any gap between brick and frame cleanly, which looks better and keeps water out.
If you are planning a door or window upgrade in a brick home and the new unit is a different size than the old one, talk to the mason before the door is ordered if you can. We are happy to work directly with your door company or with a general contractor, whichever way you prefer.
The Repointing Side of the Job
Repointing, which some people call tuckpointing, is the process of removing deteriorated mortar from the joints between bricks and replacing it with new mortar. The brick on this house was in good shape. The mortar was the weak link, which is normal. Mortar is designed to be the sacrificial part of the wall. It is meant to wear out before the brick does, and to be replaced.
The work itself is more careful than most people expect. The old mortar is raked out to a depth of roughly two to two and a half times the width of the joint, so for a typical three-eighths-inch joint that is around three quarters of an inch to one inch deep. Any shallower and the new mortar is just a skin that pops off in a few winters. All loose material and dust is cleaned out, the joint is dampened so the brick does not pull water out of the fresh mortar too fast, and the new mortar is packed in layers rather than one deep push.
Once the mortar has firmed up to what masons call thumbprint hard, the joint is tooled to match the original profile. On this house that is a slightly concave joint, which is the most common profile in the area and the best at shedding water. Tooling compresses the mortar against the brick and closes the surface, which is what makes the joint last.
Matching the mortar matters as much as the technique. We match color and texture so the repointed areas blend in as they weather, and we match hardness so the new mortar is softer than the brick. On older brick, a mortar that is too hard, like a high-strength type S or type M mix, will not flex with the wall. It pushes the stress into the brick instead, and the brick faces start to spall. For most residential brick of this era a type N mortar is the right choice. The fresh joints in the photos look light now. They will darken a shade as they cure and settle in with the rest of the wall.
A good reference if you want to go deeper: the National Park Service publishes a technical brief on repointing mortar joints in masonry buildings. It covers joint preparation, mortar matching, and why mortar should always be softer than the surrounding brick. It is written for historic buildings, but the principles apply to any brick house in Pennsylvania.
Three things that shorten the life of brick: hard modern mortar on soft older brick, caulk squeezed into a joint instead of mortar, and high-pressure washing that blasts the mortar out of the joints. If a quote for repointing sounds unusually fast or unusually cheap, ask what mortar they plan to use and how deep they plan to rake.
How to Tell if Your Brick Needs Repointing
You do not need a ladder or a mason to spot the early signs. Walk the house after a rain and look at the joints, especially the lowest courses, the corners, and anywhere water runs off the roof or a downspout.
- Recessed joints. Mortar that has worn back from the brick face, leaving a small ledge where water can sit.
- Cracked or crumbling mortar. Press a key into the joint. If it crumbles or flakes, the mortar has lost its bond.
- Missing mortar. Open gaps you can see daylight or soil through, common near grade and behind shrubs.
- Moss or dark staining along joints. A sign that joints are holding water instead of shedding it.
- Loose or shifting bricks. If a brick moves when you push on it, the mortar around it is gone and the fix should not wait.
- Damp spots inside. Moisture on the inside of an exterior brick wall often traces back to failed joints outside.
Catching it at the recessed-joint stage is the cheap version. Waiting until bricks are loose means some of them need to be reset, which is a bigger job.
What Affects the Cost of a Job Like This
Every house is different, so we quote from photos and a site visit rather than from a price list. The things that move the number the most on an opening change are the width of the new opening, what is bearing on the wall above it, the size of lintel the span calls for, how much of the lower wall has to be rebuilt, and how close a brick match the existing wall needs. Access matters too. A back wall opening onto a patio is easy to work. A second-story window is not.
For repointing, the cost follows how many linear feet of joint need attention, how deep the deterioration goes, whether any brick has to be reset, how much height we are working at, and whether the mortar needs to be custom matched. Spot repointing a few corners is a very different job from repointing a whole elevation. We will tell you honestly which one your house needs.
Questions Homeowners Ask About Widening Openings and Repointing
Can any opening in a brick wall be made wider?
Most can, but it depends on what is above and beside it. A single-story back wall is usually straightforward. An opening under a lot of wall, close to a corner, or next to another opening may need an engineer to size the lintel. We will tell you up front if that is the case.
Do I need a permit to widen a door opening?
Changing the size of a structural opening is generally permitted work in York County municipalities, since it involves a new lintel. Requirements vary by township and borough, so check with your local code office. We can tell you what we have seen in your area.
Will the new brick match the old brick?
Close, not perfect. Brick changes color as it weathers for decades, and new brick starts out cleaner. We match the blend, size, and texture as closely as possible and match the mortar color, and the difference softens within a couple of seasons. Below a door sill, as on this project, it is barely noticeable.
How long does the masonry part take?
Cutting and rebuilding an opening like this is typically a few days of masonry work, followed by cure time before the door goes in. Repointing time depends on the amount of joint. We give a schedule with the quote so the door installer can plan around us.
How long does repointing last?
Done with the right mortar and the right depth, repointed joints should last decades. The original mortar on most York County brick homes lasted fifty years or more. The goal of good repointing is to buy the wall another stretch like that, not a few winters.
Should I repoint the whole house or just the bad spots?
If deterioration is limited to a few areas, like the corners and lower courses on this house, spot repointing is the sensible choice. If joints are failing across whole walls, repointing the elevation gives a more even result and usually costs less per foot than coming back repeatedly.
Opening Changes and Repointing Across York County
We widen door and window openings, install lintels, and repoint brick for homeowners throughout York County and the surrounding area. If you are upgrading a door, adding a window, or you have noticed the joints on your house starting to wear, send us a few photos and we will tell you what we see.
📍 York, PA
📍 Red Lion
📍 Dallastown
📍 Shrewsbury
📍 Glen Rock
📍 New Freedom
📍 Hanover
📍 Spring Grove
Upgrading a Door or Window in a Brick Home?
Send us the door spec and a couple of photos of the wall. We will tell you what the opening needs, whether the joints around the house should be repointed at the same time, and what the schedule looks like.
Get a Free EstimateProject Details
Job Summary
Location
York County, PA
Work Done
Widened an existing exterior door opening in a brick wall for a new wide glass door unit, removed the old stoop, installed a new lintel sized for the span, rebuilt the brick courses below the sill, and repointed deteriorated mortar joints around the house
Materials
Steel lintel, matched clay brick for the new courses, type N mortar color-matched to the existing joints
Coordination
Masonry opening built to the door manufacturer’s rough opening dimensions. The customer’s door installer set the door after the masonry cured. LBE Masonry finished the jamb pointing afterward.
Repointing
Corners and lower courses, joints raked, cleaned, repacked and tooled to match the original concave profile
Completed
2026